Portland Museum Model Blog Post 3
- elliottjellis
- Dec 2, 2021
- 4 min read
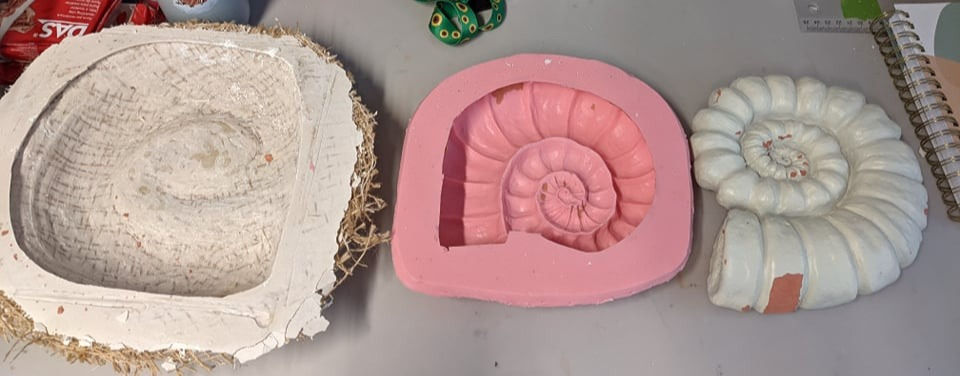
With the sculpting finished on the Ammonite shell, I now needed to create a mould. I chose to make a jacket mould for the shell, as making a solid block mould would have used much more silicone. I created a box out of styrene to put the shell in, leaving enough room to pour the silicone, and blocked off any extra space with air drying clay.
To begin with, I poured on a thin layer of condensation-cure silicone. This thin layer is best for picking up all the detail in the shell, and getting into all the small gaps under the shell. The next two layers of silicone included thixotropic additive, which made the silicone much thicker. This meant I could add thick layers of it to the mould, strengthening it. I smoothed out the final layer to make it easier to make the hard jesmonite jacket.
Once the silicone was fully cured, I added a jesmonite jacket to the mould. This holds the silicone in place and prevents it from moving and warping when casting the shell later. The jacket was made using layers of jesmonite, a strong plaster like material, with layers of hessian inside it, for this mould I used 6 layers of jesmonite and hessian. The hessian strengthens the jacket, and prevents it from breaking or cracking. I also used some fibreglass chips in the first layer to add extra strength to the jacket.
With that finished I demoulded the sculpt and cleaned up the mould for casting. I struggled to demould at this stage as the silicone had a small undercut in it, which was made while trimming it prior to making the jesmonite jacket. I did not use locators in the silicone of the mould, as I did not need them for this type of mould, however I may have used them if the mould was more complex.

I then sculpted the head / body of the ammonite. As mentioned in my previous post, I used cuttlefish, nautilus and ammonite illustrations as the basis for this sculpt. I also used the plaster cast I had taken of the shell to ensure that the body was the correct size. I sculpted it out of air drying terracotta clay as I had with the shell. Before making the mould I did use more clay to fill the gaps between the two longer tentacles and the baseboard in order to make the mould making process easier.
I feel that this point is where time management became an issue for me, as the previous parts had taken much longer than expected, as I was running out of time to finish the moulding and casting process.
For the body I made a one part plaster mould. The mould needed to be hard for this part as the cast would be a soft material. I feel now, that a two or three part mould would have worked much better.
I made a cast of the shell, using the same jesmonite and hession method used for the moulds jacket, being more careful to avoid the hession from showing through in the final cast. This time I used just two layers, as six would made been too many.
As I attempted to clean the body sculpt out of the mould with tools, I realised that the curling position of several tentacles had caused them to be inaccessible to me for cleaning out. Usually a dirty cast would be taken to try and pull any dirt from the mould, however I would not have time to do both a dirty cast and a proper cast of the ammonite, so a single cast in order to have a model to hand in was my only choice. I had also hoped to do pigmentation tests on the silicone, to get the correct colour. The mix of flesh tone, red and yellow I used had too much red in and so the cast ended up far pinker than my desired colour, which would have been a more orange flesh tone, like the skin of a squid.
I removed the shell cast from the mould, which sadly cracked on its way out of the mould. I also learned at this point that the mould was not cleaned well enough, and had a lot of holes that were probably created from the first demoulding process. I filled in the cracks and holes with car body filler, and sanded out as much clay as possible. I had planned to paint brown speckled stripe patterns onto the shell like that of a nautilus, and spray it with a clear lacquer to protect it, and give it a shiny finish, however I fell short on time. I also wanted to saw out the end of the shell in order to glue the body inside.

Overall I am not at all pleased with the outcome of this project. I really struggled with time management, as well as a lack of prior knowledge of moulding and casting due to missing out on lessons about it during the pandemic. I plan to re-sculpt, mould and cast both the shell and the body over December and January. I plan to make a much cleaner shell mould, and a more detailed and textured body sculpt which I will make the mould for in multiple parts. I hope to learn from my mistakes the first time in order to make a model I am truly happy to give to my client.


Comments